• And now, for something a bit different.

    We’ve got this jasmine bush growing indoors under a growlight. Recently, some of its leaves started to turn yellow and drop off.
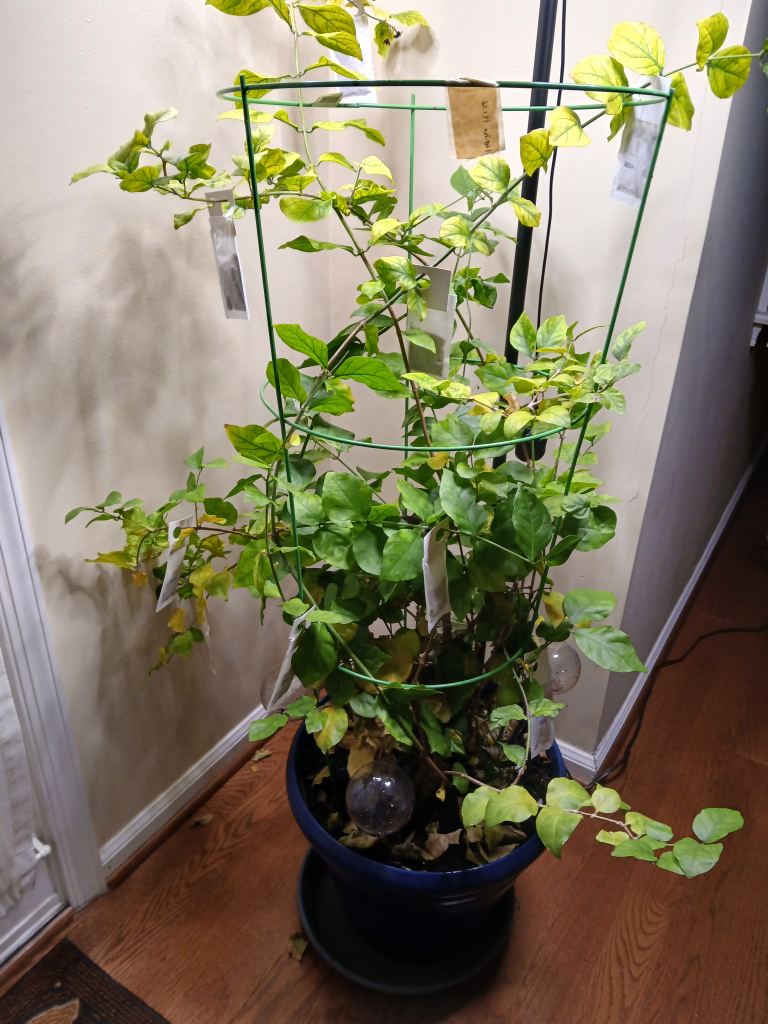
    Figure 1. A sad jasmine bush. And it’s covered in mysterious sachets. Hm…

    Oh no!

    At first, I thought it might be a watering or nutritional issue. However, I discovered another problem upon closer inspection. Suspecting that something might be feeding on the plant’s precious bodily fluids, I broke off a piece of leaf to look at on the microscope and it was teeming… with mites! Here’s one on the move:

    Video 1. Mite on a jasmine leaf.

    I’m not an arachnologist, but these appear to be two-spotted spider mites. They are common pests which can cause damage to a wide variety of plant species [4]. I watched the mites for a few minutes. During this time, I observed them moving from place to place, occasionally stopping to feed on the leaf.

    I wanted to get a close-up video of a mite feeding, but there was a slight problem. The light source on my microscope is not sufficient for this purpose. This is for two reasons:

    1. I wanted to look at mites sitting on top of a leaf. My sample is illuminated from below, so the light has to travel through the leaf before it reaches the mite, and eventually, my lens. This makes for a dim image.
    2. I needed to use an objective lens with a higher magnification. Higher objective lenses allow less light in. This also makes for a dim image.

    The solution is simple: use a brighter light source. Fortunately, I have an LED bulb on hand which is much brighter than my usual light source. So, into the microscope it went!
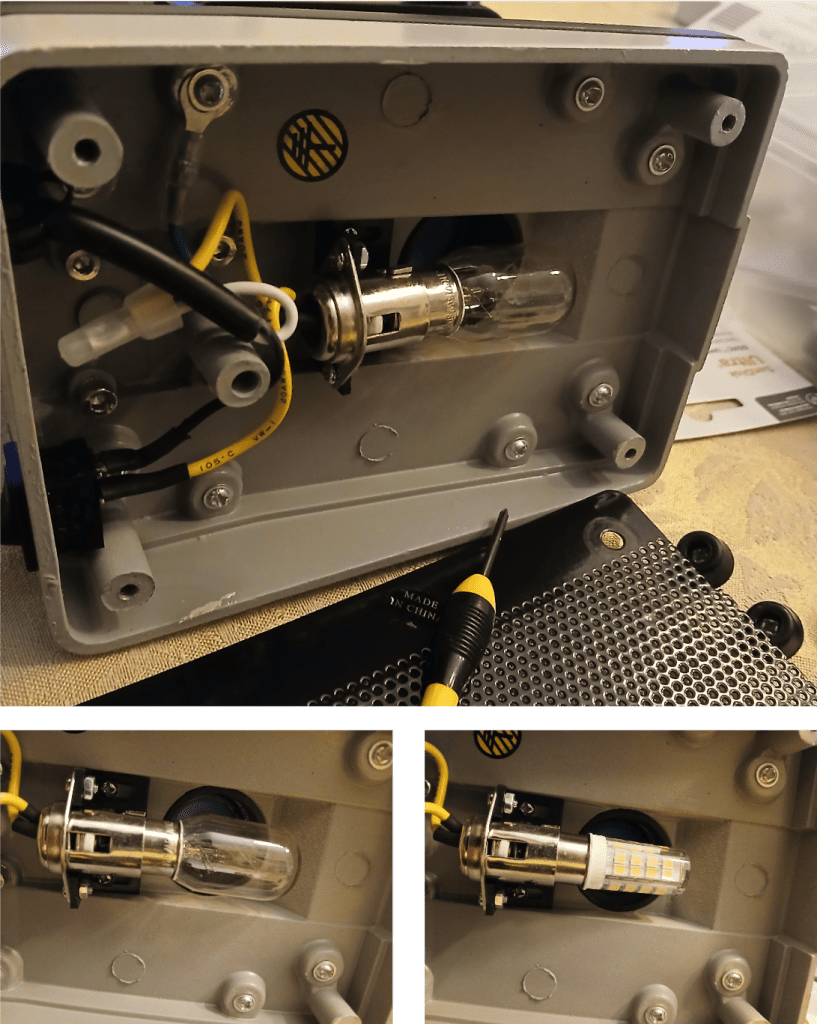
    Figure 2. Top: Opening the bottom of the microscope to replace the light source. Bottom left: Original bulb before replacement. Bottom right: New LED light source. Much better!

    I don’t normally use the LED light because it can be too bright (hurts my eyes) and has a harsh blue-ish color. However, it was quite useful in this case.

    Right, then… behold! A spider mite feeding on a jasmine leaf!

    Video 2. Spider mite feeding on a jasmine leaf.

    If you look closely, you can see a bunch of… stuff inside the mite moving from side to side. What is it doing? According to this source [3], this material is located inside of the caudal caeca. The caudal caeca are two sac-like extensions of the gut that run along the sides of the mite’s body. They connect to each other in the center of the mite’s body, just behind the head. Contraction of muscles around the gut causes material to move rhythmically from one caecum to the other [3].

    The little spots we can see moving back and forth are probably digestive cells. These specialized cells break off from the lining of the caeca. Then, they begin to ingest material from the surrounding gut contents as they float freely about. They are believed to accumulate unwanted digestive waste products. Consistent with this idea, they are eventually excreted as faecal material [3]. Pretty neat! In case my description was not colorful enough, Figure 1 from the source paper [3] is extremely helpful.

    Fighting mites with mites

    Given that these spider mites are damaging my jasmine plant, how can I stop them?? This plant is indoors (and it is winter, so it can’t go outside). Therefore, physical measures (spraying with a hose to remove the mites) and pesticides aren’t super practical. Removing the more heavily infested branches seems like a good place to start. A biological pest control solution might also also help. In this case, I have decided to fight the spider mites with yet more mites. Sure, that seems reasonable…

    To be specific, I’ve employed the help of a predatory mite, Amblyseius andersoni, which actually eats spider mites. How convenient! They come in little sachets which resemble tea bags. You hang the sachets on the infested plant, and the Amblyseius mites crawl out of the little hole in the sachet and begin to feed on the spider mites. They might not finish off the spider mites completely, but I hope they will help me to keep them under control until I can get the plant outside (where I can use other control techniques if necessary).

    As it happens, I received way more sachets than I ordered. So, rather than let them go to waste, I absolutely covered the jasmine bush with them (See Figure 1). This is probably overkill, but we’ll see.
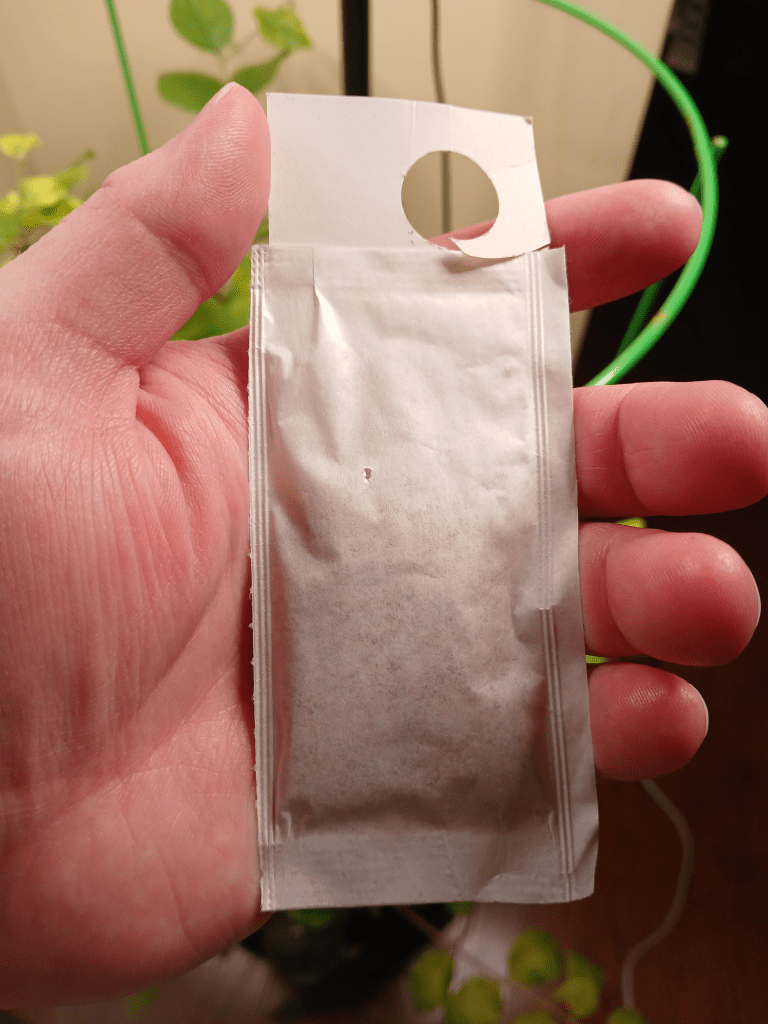
    Figure 3. A sachet containing Amblyseius andersoni mites.

    There are a number of different predatory mite species which are commercially available to help deal with spider mite infestations. I don’t know much about mites, but I chose A. andersoni (as opposed to, say, Persimilis mites) because it is supposed to be able to tolerate a wider range of temperature and humidity conditions [2][5]. This is necessary because our living space is fairly cool (~66˚ F) and dry (~40% RH), and predatory mites usually prefer higher temperature and humidity. To help matters, I’ve placed a humidifier next to the jasmine bush to make the mites more comfortable.

    After receiving my A. andersoni in the mail, I decided to cut one of the sachets open to see if the mites were viable. I was pleased to see many live mites at several different life cycle stages. Mites are arachnids, meaning that they have 8 legs. However, the larval stage of A. andersoni only has 6 legs [1]. Here is one that I saw:

    Video 3. A. andersoni larva, with 6 legs.

    As the mites grow and molt, they develop their final pair of legs. This mite is at a later stage of the development process and has all 8 legs. They’re darn quick, too, and really tricky to film… I got lucky with this one!

    Video 4. A more mature A. andersoni mite, now with all 8 legs. New-and-improved!

    Here’s hoping our mite friends do the trick!

    Works Cited

    [1] Amblyseius andersoni. (2025). Koppert US.Retrieved February 15, 2026, from:  https://www.koppertus.com/crop-protection/biological-pest-control/predatory-mites/amblyseius-andersoni/?utm_term=redirect

    [2] Amblyseius andersoni – Generalist, Tolerates High Heats. (2026) NaturesGoodGuys. Retrieved February 15, 2026, from:  https://www.naturesgoodguys.com/products/amblyseius-andersoni?variant=42422847111359

    [3] Bensoussan, N., Zhurov, V., Yamakawa, S., O’Neil, C.H., Suzuki, T., Grbić, M., & Grbić, V. (2018). The Digestive System of the Two-Spotted Spider Mite, Tetranychus urticae Koch, in the Context of the Mite-Plant Interaction. Frontiers in Plant Science 9, 1206.

    [4] Hazzard, R. (2022, July 28). Two-Spotted Spider Mite. UMassAmherst. Retrieved February 15, 2026, from: https://www.umass.edu/agriculture-food-environment/vegetable/fact-sheets/two-spotted-spider-mite

    [5] Murray, M. (n.d.). Greenhouse Biocontrol in Utah. Utah State University. Retrieved February 15, 2026, from: https://digitalcommons.usu.edu/cgi/viewcontent.cgi?article=3332&context=extension_curall

    CORRIGENDUM

    In an earlier iteration of this blog post, Video 4 was the video shown here (which we will shall now call “Video 5”). This is NOT A. andersoni, but is instead an unidentified species of mite – likely included as food for A. andersoni in the sachets. Video 4 now shows A. andersoni. (The long legs are a hint).

    Video 5. An unknown mite, which I mistakenly labelled A. andersoni…

    An update!

    A very late update, I know… apologies.

    In case you were wondering, we DID eventually rid this jasmine bush of spider mites. It took a couple rounds of predatory mites – in particular, I believe that the persimilis mites (a 4000-mite dose) were the most effective. These mites require a high humidity to survive, so I wrapped the jasmine bush with a plastic bag and put the outlet of a humidifier into the bag to blow moist air in.

    There’s a few persimilis mites. They look a lot like A. andersoni, but they’re a reddish color…

    A couple weeks after treatment with the 4000 persimilis mites, I did not see any more spider mites. The jasmine plant actually started flowering again. Several months later, the jasmine is back outside for the summer and looking considerably happier!

    I don’t know what species of jasmine this is, but it has these lovely white flowers which turn a deep purple just before they drop off. Good times.

  • Last week I introduced you to the genus Lithops, which have a fairly unusual anatomy. While observing my own lithops plants over the last several weeks, I made a few more miscellaneous observations that I wanted to share with you. I hope you find them diverting!

    Otherwise – happy holidays! I look forward to providing more content to you, the reader, in the coming year.

    Splitting!

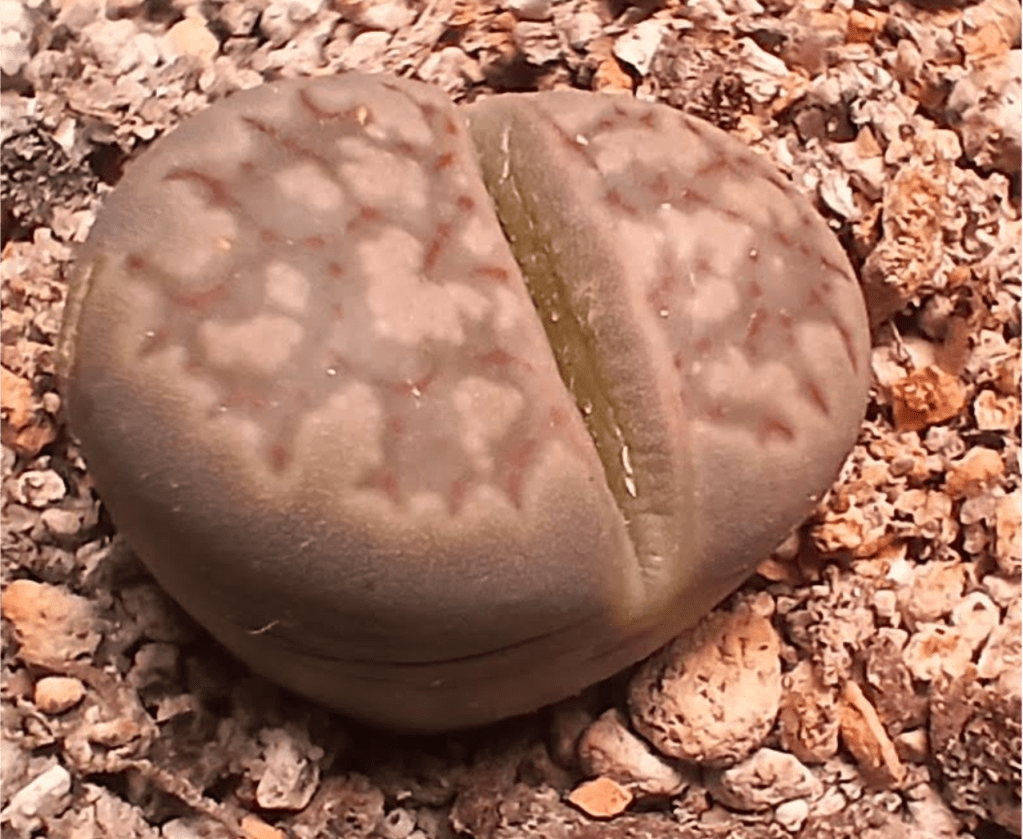
    OK, this observation was particularly exciting for me, a first-time lithops owner. I noticed that one of my plants has started splitting! This is the process by which lithops grow. It looks like this:

    Figure 1. A splitting lithops plant!

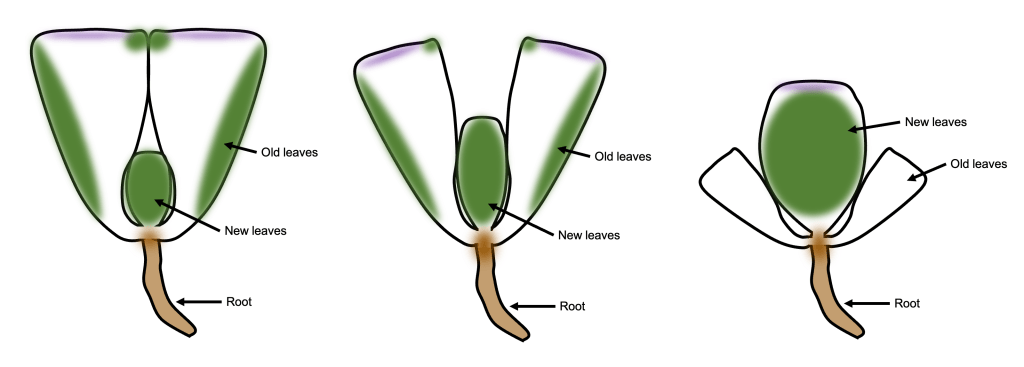
    What are we looking at here? As we learned last week, when you look at a lithops plant, you can see two fused succulent leaves. New sets of leaves form deep inside the center of the plant, and are not initially visible (See Figure 2 left). As the new leaves grow, they push the old leaves apart. To conserve water, the new leaves will absorb water from the old leaves; this is a helpful adaptation to living in dry climates [4]! Eventually, the old leaves shrivel and die, leaving just the new pair of leaves behind.

    Figure 2. Simplified diagram of the splitting process.

    Itchy scratchy…

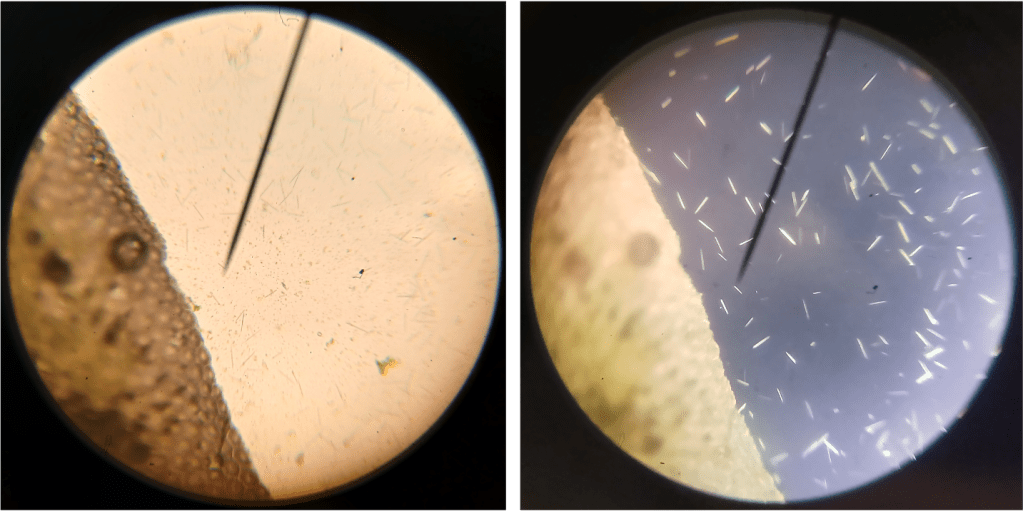
    One of the things I noticed while looking at lithops tissue on the microscope was the presence of lots of tiny crystals. These were particularly abundant when I squished the tissue (which releases cell contents into the water that the tissue is suspended in). These crystals are very difficult to see under normal illumination (Figure 3 left). However, using polarized light microscopy, their presence becomes… crystal clear (Figure 3 right)!  

    (For the polarized light microscopy, I ordered a cheap polarizing filter sheet online and cut it into two halves. I placed one half beneath my sample, and the other half above it. Then, I rotated the top polarizer so that it was perpendicular to the bottom polarizer. This is super easy to do at home! I won’t say much more here, but there is a really excellent animation explaining the principle behind polarized light microscopy on the relevant Wikipedia article: https://en.wikipedia.org/wiki/Polarized_light_microscopy).

    Figure 3. Raphides from damaged lithops tissue. Left: Under normal illumination. Right: Using polarized light microscopy.

    From my reading, I am reasonably confident that we are looking at raphides here. Raphides are tiny crystals (typically calcium oxalate) which are common in many species of plants. They are thought to protect plants against predation, as they are sharp and could in theory cause irritation in animal tissues that come in contact with them.

    I found this interesting study [2] which demonstrates that raphides inhibit the growth of silkmoth larvae when ingested, particularly in combination with cysteine protease, an enzyme common in plant tissues. Importantly, this study verified that the shape of the raphides, rather than their chemical composition, contributes to their defensive function (since amorphous calcium oxalate particles did not have the same effect) [2]. Fascinating. There is apparently also evidence that raphides in large quantities are toxic to humans. This article about an outbreak of foodborne illness in Chicago associated with raphide consumption made for particularly grim reading [6].

    I couldn’t find much information about raphides in lithops specifically, although the thesis of Robert Wallace (Rutgers University, 1988) does note their presence [5]. So, someone has seen this before! Whew.

    AAAAAAAAAAAAH

    Stomata are pores found on virtually all plants which facilitate gas exchange with the environment. Plants take up oxygen from the atmosphere for respiration and CO2 for photosynthesis. Conversely, oxygen is also released from plant tissues as a byproduct of photosynthesis, and CO2 is released as a byproduct of respiration. Thus, stomata help plants to achieve the correct concentration of oxygen and CO2 in their tissues. Stomata also allow plants to transpire (release water via evaporation), which is essential for thermoregulation and for water transport. I might do a dedicated post (or a few!) about stomata later – they’re really interesting!

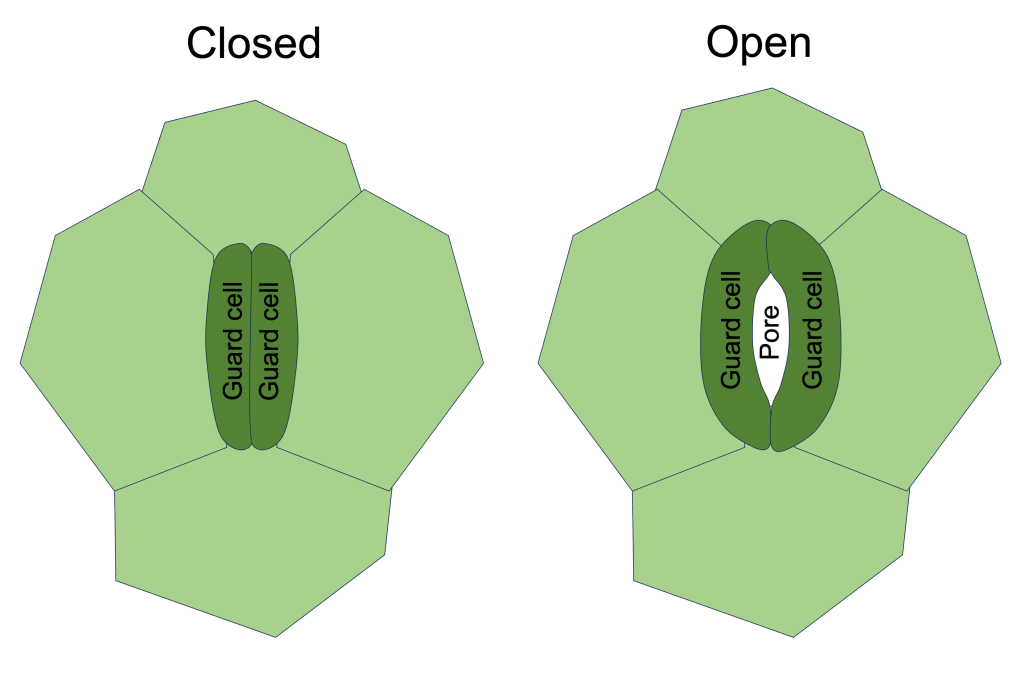
    Plants control gas exchange by opening and closing their stomata. This opening/closing is facilitated by specialized cells known as guard cells. Two guard cells lie on either side of every stomatal pore. The pore opens when the guard cells inflate, and closes when the guard cells deflate (See Figure 4). Guard cells inflate/deflate due to intake/expulsion of water via osmosis. How this is controlled is beyond the scope of this post, but I may come back to this at a later date.

    Figure 4. Simplified diagram of a single stoma in the closed state (left) and open state (right).

    Why am I talking about stomata now? I am talking about stomata because I came across this interesting blog post [3] a short while ago. It’s a great piece on lithops biology (would recommend!), but one sentence stood out to me: they claim that one species, Lithops dorotheae, has 3 guard cells per stoma instead of the usual 2! This was surprising to me, and raised a few questions:

    1. Guard cell configuration is highly conserved amongst different groups of plants. Why should L. dorotheae be different?
    2. How would the stomata be able to open/close with 3 guard cells?

    I decided that it would be fun/worthwhile to verify this myself. To this end, I did two things: First, I tried to find the original source of this information to see what it said, exactly. Second, I acquired some domestically-grown L. dorotheae plants so that I could make my own observations! Note: when purchasing lithops, it is important that you buy domestically-grown plants, for ecological, health, and legal reasons. Always check the source. Anyway…

    Figure 5. A small L. dorotheae plant. It looks a bit different to my other lithops (which I’m pretty sure are L. karasmontana). Check out the little red stripes!

    OK, so the source of the information about the unusual guard cells in L. dorotheae appears to be that Wallace thesis from 1988 [5]. However, Wallace says that that stomata in L. dorotheae have 3 subsidiary cells… NOT that they have 3 guard cells. Aha! This makes more sense.

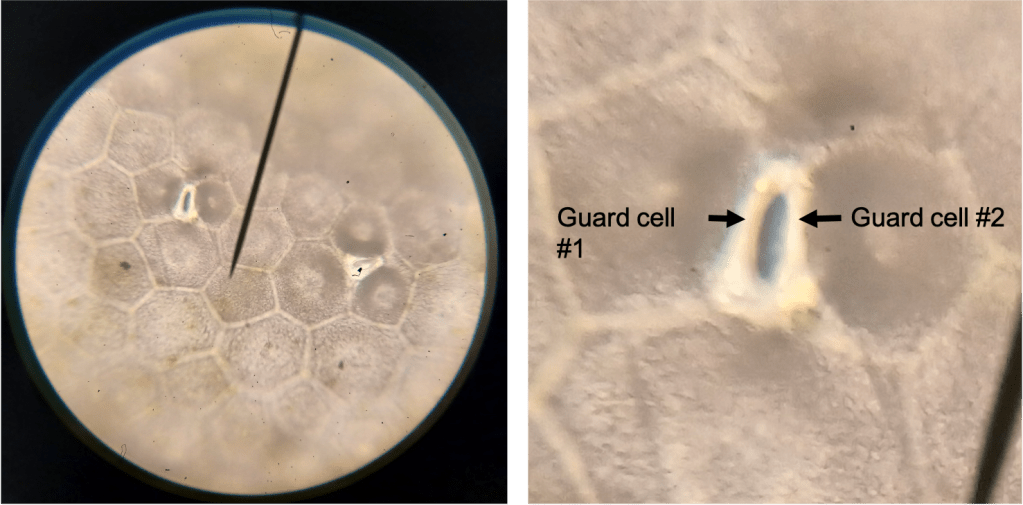
    Subsidiary cells are specialized epidermal cells which surround the pair of stomatal guard cells. In the case of my L. karasmontana plant, these cells are indistinguishable from other epidermal cells (Figure 6 left). However, in L. dorotheae, I observed the presence of 3 or 4 cells surrounding each stoma, which are more darkly colored than the other epidermal cells (Figure 6 right). I think this is probably what Wallace was referring to. Importantly, the stomata on my L. dorotheae plant have the normal 2 guard cells… (Figure 7).

    Figure 6. Epidermis of my L. karasmontana (?) plant (left) and L. dorotheae plant (right) at 100X magnification. The top half of the figure are the original images; In the bottom half, I have circled the stomata that I can see.

    Figure 7. Stomata in L. dorotheae, at 400X magnification. Left is the original image; Right is a cropped version of the same image blown up to show a single stoma clearly. The two guard cells are visible (compare to my drawing in Figure 4).

    What do the subsidiary cells actually… do? Unfortunately, this is not an easy question to answer, and probably depends on the species of plant. One thing that Wallace (1988) mentions is that stomata in lithops are sunken below the main surface of the epidermis [5]. The shape of the subsidiary cells may help to achieve this sunken topography. It has been theorized that sunken stomata are an adaptation to prevent excessive water loss in plants growing in dry climates [1]. Having sunken stomata increases the depth of the boundary layer of air above the pore, which may slow the diffusion of water molecules away from the pore [1].

    Works cited:

    [1] Gray, A., Liu, L., & Facette, M. (2020). Flanking support: How subsidiary cells contribute to stomatal form and function. Frontiers in Plant Science 11. DOI: 10.3389/fpls.2020.00881

    [2] Konno, K., Inoue, T.A., & Nakamura, M. (2014). Synergistic Defensive Function of Raphides and Protease through the Needle Effect. PLoS One 9(3), e91341.

    [3] Living stones: Growing Lithops. (2018, October 25). Nerd Rambling. Retreived December 21, 2025, at: https://atreyuoz.blogspot.com/2018/10/growing-lithops.html.

    [4] Sajeva, M., & Oddo, E. (2007). Water Potential Gradients beween Old and Developing Leaves in Lithops (Aizoaceae). Functional Plant Science and Biotechnology, 1(2), 366-368.

    [5] Wallace, R. (1988). Biosystematic Investigation of the Genus Lithops N.E.BR. (Mesembryanthemaceae). PhD dissertation, Rutgers University.

    [6] Watson, J.T., Jones, R.C., Siston, A.M., Diaz, P.S., Gerber, S.I., Crow, J.B., & Satzger, R.D. (2005). Outbreak of food-borne illness associated with plant material containing raphides. Clinical toxicology 43(1), 17-21.

  • You may have noticed that there was a large gap between this post and the last. My apologies. I’m increasingly busy, and so my posts will unfortunately be more sporadic from now on. But fear not, the releases shall continue! They’ll be special occasions… think Christmas, but not as good.

    Anyway, I recently acquired these lovely lithops plants at a local garden center (Figure 1 left). The name “lithops” is derived from the Greek word for “stone”, because they look like kind of like pebbles when viewed from above. They’re definitely weird looking. I rather like them, but some of my relations commented that they look like toes. Now I can’t unsee that. **shudders**.

    Lithops is a genus of succulents native to southern Africa. Because they are popular houseplants, you should be able to find tons of information about their care and growth habits online. There are also already a few excellent blogs about lithops biology (easily found via google search). Therefore, in order make this blog post a bit more unique, I will be using my light microscope to look at some of their more interesting features up-close! So, read on if you want to see lithops in more detail than you would ever reasonably need to.

    An aside: I’ve never seen lithops in the wild, but I noticed while looking through some old pictures that I’d inadvertently photographed one of their relatives in the Canary Islands years ago. Both lithops and the ice plant (Figure 1 right) are members of the family Aizoaceae. And they’re both unusual in their own right!

    Figure 1. Left: An unidentified lithops (possibly L. karasmontana?) plant currently inhabiting our hallway. Right: an ice plant (Mesembryanthem sp.) photographed on the Canary Islands. They don’t look very much alike, do they? Try looking for images of their flowers… that might clear things up for you.

    Ok, seriously, what am I looking at here?

    Looking at Figure 1, it’s probably obvious to you that lithops have a fairly unusual anatomy. They barely look like plants at all! So, when we look at a lithops, what are we really seeing?

    Basically, the part of the plant that we can see is made up of two succulent leaves that are fused together at the base. The other parts of the plant, such as new pairs of leaves and the meristematic tissue that generates them, are hidden inside (see Figure 2 below, or source [6] for a photograph of a dissected lithops).

    Figure 2. Cutaway of a lithops plant to show its internal structure.

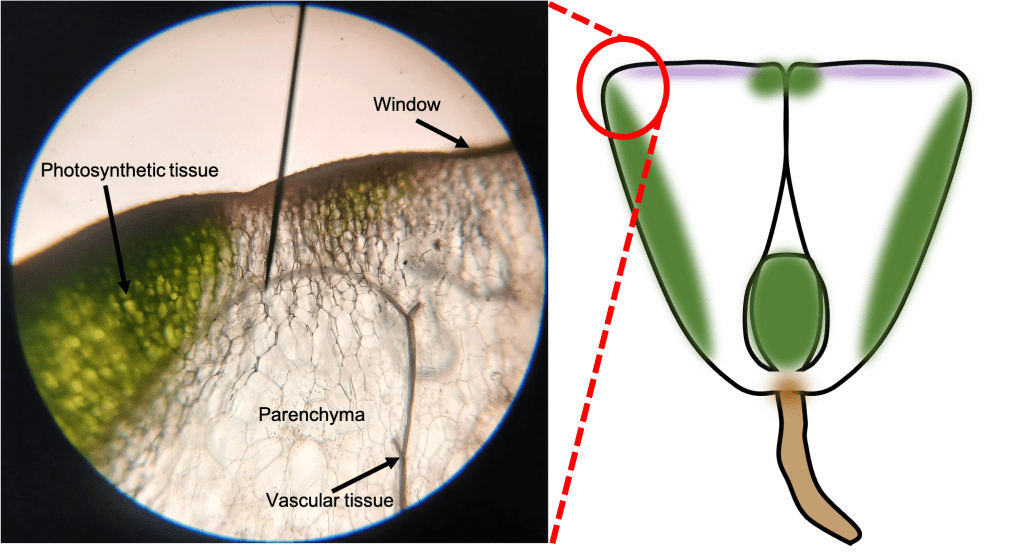
    The leaves of the lithops plant have an unusual structure. The green photosynthetic tissue is not visible from the outside; Rather, it lines the inside of the sides of the leaf. The skyward-facing part of the leaf, also known as the “window”, is relatively transparent, allowing sunlight to enter and reach the photosynthetic tissue. Most of the volume of the leaf is taken up by transparent parenchyma tissue, which stores water and allows light penetration.

    Despite its odd anatomy, when we examine lithops at the cellular level, we can see that it’s really not so different from other plants after all. For example, if we look at the epidermis of the leaf, we can see that it is made up of tightly interlocking epidermal cells punctuated by pores known as stomata (Figure 3). We’ll talk more about those in our next blog post (stay tuned!). But for now, just know that these structures are found in virtually all land plants and are required for gas exchange between the leaf and its environment (O2 and CO2 for respiration and photosynthesis, respectively).

    Figure 3. Closeup of the lithops epidermis (400X), showing epidermal cells and an individual stoma. Stomata are themselves made up of two guard cells, which surround a central pore.

    If we cut into a leaf and examine some of the green tissue, we can see that there is a layer of photosynthetic cells which are by traversed by a network of vascular tissue (Figure 4). Taking a closer look at the photosynthetic cells, we can see that there are abundant chloroplasts, which give them their green color (Figure 4 bottom left). If we look more closely at the vascular tissue, we can see intricate reticulations which are characteristic of xylem, which transports water (Figure 4 bottom right). This is all pretty textbook plant stuff, nothing unusual to see here.

    Figure 4. Closeup of lithops green tissue. Top right: A zoomed-out image of a section of green tissue. Bottom left: 400X image of photosynthetic cells, showing chloroplasts. Right: 400X image of vascular tissue.

    Finally, if we take a transverse section of a leaf, we can observe the transition from the green photosynthetic tissue on the side to the clear tissue of the window on the top (Figure 5). The lack of pigmentation in the cells directly below the window allows sunlight to enter the leaf. However, I did notice a slight purple tinge in this region – this is possibly due to the presence of anthocyanins, which may help protect delicate structures within the leaf from harmful radiation [2]. In Figure 5, we can also observe the water-storing parenchyma cells. These cells lack pigment, and are super-ginormous (technical term).  

    Figure 5. Transverse section of a lithops leaf, showing several different parts: photosynthetic tissue, window, and parenchyma tissue.

    “How many are there?! 36, counted them myself…”

    The classification of species within the Lithops genus is a bit of a complicated affair. As of 2011, there were actually 37 recognized species of lithops [3], though this number is not set in stone. One problem is that different species of lithops are difficult to tell apart by eye. This is partly due to considerable variation in morphology even within individual species. As such, the grouping of lithops populations into species is subject to potential revision. For example, a genetic study in 2019 determined that L. amicorum was not its own distinct species, but was actually a sub-population of L. karasmontana [5]. (So perhaps there are 36 species now, eh?)

    Genome sequencing would surely enable more robust phylogenetic analysis within the Lithops genus. Unfortunately, I could not find any publicly available Lithops genomes by searching the NIH genomes database (https://www.ncbi.nlm.nih.gov/home/genomes/). There appear to be two Lithops genome sequencing projects currently in the works: Lithops lesliei (Iridian Genomes) and Lithops karasmontana (Kew Gardens), but there isn’t much available information from either of these projects yet (although Kew does have some annotated gene sequences for L. karasmontana available on the tree of life: https://treeoflife.kew.org/specimen-viewer).

    Of course, genome sequencing is not a trivial exercise; Furthermore, to look at relationships between species, you would need to do it many times over. If only there were a more efficient way to assess the genetic differences between distinct populations of lithops!

    The two studies that I cited above [3][5] do just that, using something called AFLP markers (Amplified Fragment Length Polymorphisms). But what the heck are AFLP markers? Fortunately, the name “AFLP” is fairly descriptive. AFLP’s allow you to differentiate between populations by assessing the Lengths of Amplified Fragments. Er…

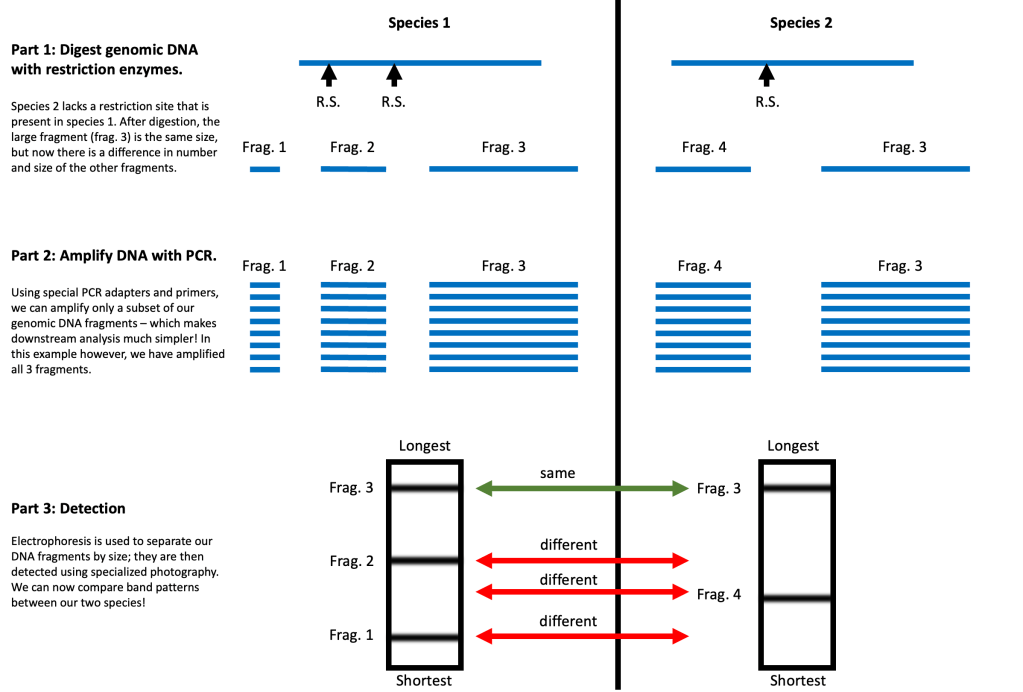
    When we say “Fragments”, we are referring to pieces of DNA. You can generate DNA fragments by digesting genomic DNA with restriction enzymes – which cut the DNA in a sequence-specific manner. This produces many fragments of variable lengths. Genomic DNA from different species varies in the location and number of restriction sites, and so will generate fragments of different sizes.

    When we say “Amplified”, we mean that the DNA fragments have been amplified using a technique called PCR. Basically, PCR allows you to take tiny amount of DNA and copy it over and over again until it can be easily detected. Amplified DNA fragments are then sorted by size using a technique called electrophoresis, and are subsequently detected using specialized photography. Advanced statistical techniques are then used to assess the similarity between species on the basis of the sizes of many DNA fragments simultaneously.

    A more detailed explanation of AFLP markers is beyond the scope of this blog, but I’ve added a grossly over-simplified diagram below to make the concept easier to visualize. I’ll also direct you to this short article, which explains AFLP’s better than I ever could: [1]. But the take-home message is this: AFLP markers have enabled researchers to explore the genetic relationships between Lithops species without the need for genomic sequencing. And that’s a wonderful thing!

    Figure 6. Simplified overview of AFLP marker analysis to assess the genetic similarity between two species.

    Gene of the week/month/or something:

    Let’s conclude this first exciting installment of our “Lithops” series with a Gene of the Week! As I pointed out earlier, there are not annotated genomes available for Lithops, and the functions of individual genes in Lithops have not really been explored. Because of this, I thought I’d just pick a random L. karasmontana gene sequence from the Kew Tree of Life dataset (https://treeoflife.kew.org/tree-of-life/6889) and have a bit of fun with it!

    The gene I’ve picked (drumroll please) is… UVH6! More precisely, this is a Lithops ortholog of the UVH6 gene in Arabidopsis. There isn’t much we can infer about the Lithops gene with the information we have. All I can say is that there is a DNA sequence labelled “UVH6” in the Kew dataset, and that it is only a fragment of the total length of the Arabidopsis UVH6 gene (at 1002 bp long). However, this fragment shares 77% sequence identity with the equivalent region of the Arabidopsis gene, which is pretty good!

    Figure 7. Left: A portion of the Blastn alignment of the putative UVH6 sequence from L. karasmontana (top) and the UVH6 sequence from Arabidopsis (bottom).  (https://blast.ncbi.nlm.nih.gov/Blast.cgi). Right: Alphafold predicted structure of Arabidopsis UVH6 protein, because everyone likes pretty pictures (https://alphafold.ebi.ac.uk/entry/AF-Q8W4M7-F1).

    Since the UVH6 gene in Lithops has not been studied, we can only infer its possible functions by looking at its homologs in other species, such as Arabidopsis. Based on its homology to well-characterized genes in yeast and humans, the Arabidopsis UVH6 probably codes for a helicase, which is an enzyme which is capable of separating the two strands which make up a DNA double helix [4]. The homologs of UVH6 in humans and in yeast have previously been shown to play important roles in repairing damaged DNA via a process called Nucleotide Excision Repair (NER) [4]. Incidentally, NER is particularly well-suited for repairing DNA lesions caused by exposure to UV radiation; It should come as no surprise, therefore, that Arabidopsis mutant plants which lack a functional UVH6 gene are sensitive (easily damaged) by exposure to UV [4]!

    As I said before, we cannot say what the functions of UVH6 in Lithops may be; However, it would be relatively safe to assume that a plant living in regions which receive a lot of sunlight (e.g. lithops) would need mechanisms for DNA repair to prevent themselves from accumulating damage due to exposure to UV. Whether this resilience comes from UVH6 or something else, we cannot say… for now.

    Works cited:

    [1] Chial, H. (2008). DNA fingerprinting using amplified fragment length polymorphisms (AFLP): No genome sequence required. Nature education 1(1), 176.

    [2] Field, K.J., George, R., Fearn, B., Quick, W.P., & Davey, M.P. (2013). Best of both worlds: Simultaneous High-Light and Shade-Tolerance Adaptations within Individual Leaves of the Living Stone Lithops aucampiae. PLoS One 8(10), e75671.

    [3] Kellner, A., Ritz, C.M., Schlittenhardt, P., & Hellwig, F.H. (2011). Genetic differentiation in the genus Lithops L. (Rushioideae, Aizoaceae) reveals a high level of convergent evolution that reflects geographic distribution. Plant Biology 13(2), 368-380.

    [4] Liu, Z., Hong, S., Escobar, M., Vierling, E., Mitchell, D.L., Mount, D.W., & Hall, J.D. (2003). Arabidopsis UVR6, a Homolog of Human XPD and Yeast RAD3 DNA Repair Genes, Functions in DNA Repair and is Essential for Plant Growth. Plant Physiology 132(3), 1405-1414.

    [5] Loots, S., Nybom, H., Schwager, M., Sehic, J., & Ritz, C.M. (2019). Genetic variation among and within Lithops species in Namibia. Plant Systematics and Evolution 305, 985-999.

    [6] Sajeva, M. & Oddo, E. (2007). Water Potential Gradients between Old and Developing Leaves in Lithops (Aizoaceae). Functional Plant Science and Biotechnology 1(2), 366-368.

  • Just a quick one this week!

    I noticed these magnificent Jewelweeds (Impatiens capensis) while traveling a few weeks ago, and I just wanted to share them with you. They’re absolutely everywhere, and they have lovely flowers! They’re native to North America, and can generally be found in low-lying areas with wet soil.

    Figure 1. Left: Patch of spotted jewelweed. Right: Close-up of the flowers.

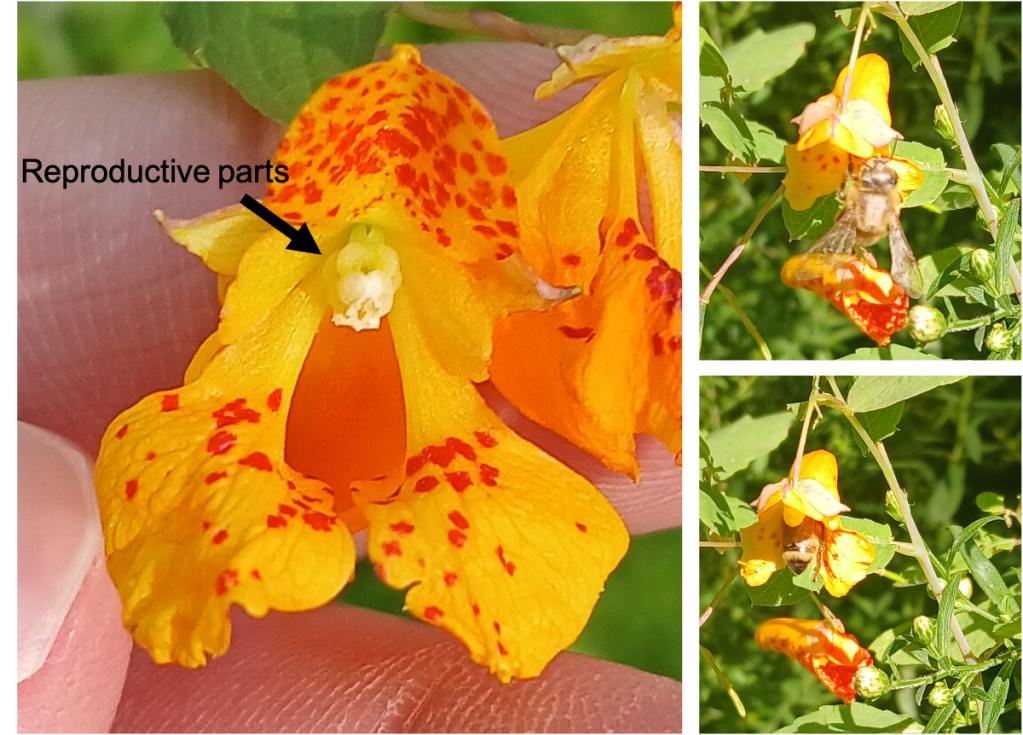
    The bees really seem to like them! However, getting to the nectar seems to be a bit of work; The bees have to dive deep into the flower to find it. As they do so, they brush up against the reproductive parts of the flower, ensuring pollination.

    Figure 2. Left: Closeup of an Impatiens flower showing the location of the reproductive organs. Right: A bee inspecting and entering a flower to find nectar.

    Fun! But what happens after the plant is done flowering is far more interesting. Jewelweeds are also known by another name – “touch-me-nots”. This is because the mature fruits explode at even the slightest touch! Actually, while I was working on this, I noted that this behavior is very similar to that of the Himalayan Balsam, which I have previously encountered while travelling. If you live in Europe or Asia, you may have seen them around. They have lovely purple flowers and explosive fruits. Anyhoo, I later found out that touch-me-nots and himalayan balsam are very closely related to each other, and are even in the same genus… so that makes sense. I feel pretty silly now, really. The explosive seed dispersal process has actually been studied in both species [1][3]. I’ll admit, both of these papers go way over my head – but it’s comforting to know that someone else has worked on this!

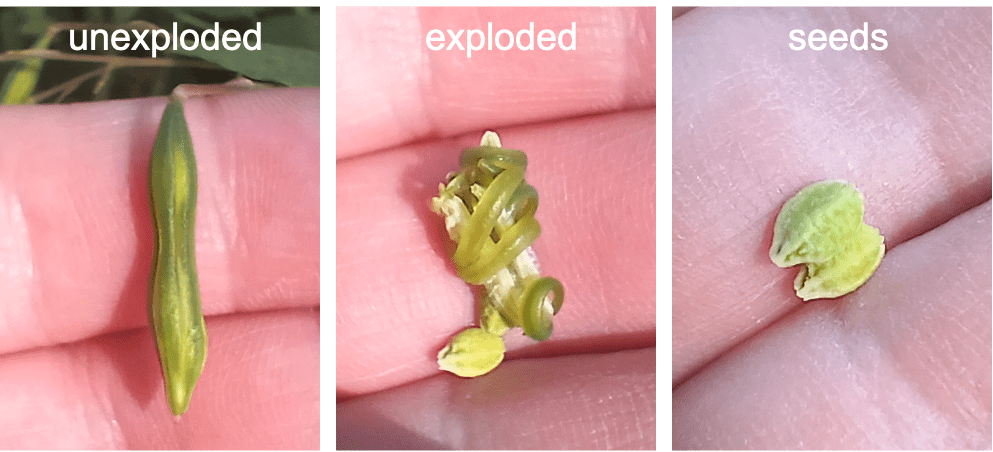
    Right, it’s time for a demonstration. In Figure 3 below, I show an unexploded seed pod on the left, an exploded seed pod in the middle, and the seeds on the right.

    Figure 3. Left/middle: Views of an Impatiens seed pod before and after the explosion. Right: Seeds!

    As you can see, the walls of the fruit coil tightly during the explosion. This indicates that they are under a great deal of tension in the unexploded fruit. Deegan (2012) show that the fruit walls are held under tension by a membrane which connects them together [1]. The slightest tear in this membrane triggers a catastrophic failure in the structure [1].

    How fast does this happen in our jewelweeds? Hayashi et al. (2009) report that the explosion takes approximately 4 milliseconds. I tried to film a seed pod using my phone, which can film at 120 fps. I got the following 4 consecutive frames:

    Figure 4. Seed ejection sequence. These are consecutive frames from a 120 fps video. An ejected seed (marked with a red arrow) can be seen travelling away from the seed pod.

    As you can see from Figure 4, the ejection begins in the second frame and is already complete by the third frame. The time between frames is ~8.33 ms, so our estimate roughly agrees with the measurement from Hayashi et al.

    Alas, I have not been able to find much information about the genetics of explosive seed dispersal. So, I will leave you with this: A genome for Impatiens capensis has been published [2]! I’m sure some folks are going to have plenty of fun with this in the future.

    Works cited:

    [1] Deegan, R.D. (2012). Finessing the fracture energy barrier in ballistic seed dispersal. PNAS 109(14), 5166-5169.

    [2] Gadagkar, S.R., Baeza, J.A., Buss, K., & Johnson, N. (2023). De-novo whole genome assembly assembly of the orange jewelweed, Impatiens capensis Meerb. (Balsaminaceae) using nanopore long-read sequencing. PeerJ 11, e16328.

    [3] Hayashi, M., Feilich, K.L., & Ellerby, D.J. (2009). The mechanics of explosive seed dispersal in orange jewelweed (Impatiens capensis). Journal of Experimental Botany 60(7), 2045-2053.